 Sylvia Melena
“Brilliant ideas must be worked for and worked after!” – Geraint A. Wiggins & Joydeep Bhattacharya1
The first time we outline a nonfiction book, we can overcomplicate things.
I know I did.
I had already written a lot of material in the past: press releases, public policy documents, manuals, environmental scans, competitive analyses for advertising clients, academic papers, and more. Yet somehow, I believed that outlining my first nonfiction book was a daunting task.
I was so worried about the potential for failure that something I had already done hundreds of times, albeit for different types of writing, paralyzed me.
I created a false mental roadblock. It didn’t exist, but it still held me back.
Contrary to what anyone tells you, outlining is outlining. If you’ve outlined before, you can do it again.
And if you need some inspiration, here’s a surprisingly easy way to outline your nonfiction book while validating the content for market demand.
How to Start Your Nonfiction Book Outline
Before you write your outline, it’s vital to lay the groundwork for a great nonfiction book that sells, makes an impact, and grows your business.
The three preliminary action items below will help you get this done. If you skip them and head straight to outlining, your book won’t resonate with your target audience, affecting your impact and sales.
- Define your purpose. Reflect on and answer the following questions: Why do I want to write this book? What do I want to achieve personally and professionally through this book? What is the goal for my book? How do I want it to impact my life and business?
- Select the perfect book topic that ignites your passion, sells more books, and grows your business. If you need help selecting your topic, check out this Free Nonfiction Book Starter Kit.
- Identify your ideal reader so you can craft a magnetic message and write a book that delivers results.
Once you’re done with the foundational work, it’s time to write your nonfiction book outline.
6 Steps for Outlining Your Book
Nonfiction book authors use various methods to outline their books. None is right or wrong.
Here’s my six-step outlining process that capitalizes on your experience, unleashes your creativity, and validates your book content for market demand.
Supplies
Gather the following supplies, then proceed to Step 1:
- Sticky Notes (Post-It or another brand),
- Thin point markers,
- Timer,
- Large wall in an area free of distractions, and
- Computer with internet access.
Step 1 – Brainstorm the Solution to Your Ideal Reader’s Problem
Quickly review your notes about your ideal reader and the one problem your book will help him solve.
What tips, tools, and resources can you give your ideal reader right now, without researching, to help him solve his problem?
Set your timer for 30 minutes and brainstorm the answer to this one question. Write all the tips, tools, and resources you can provide—one per sticky note—and post them on the wall. You don’t need to write entire sentences. Write one or two words to trigger your memory when you’re ready to start writing your book.
My Real-Life Example
My ideal reader is a first-time supervisor named Crystal. She has an employee struggling significantly with performance, and she doesn’t know how to turn things around. So, I imagine that Crystal shares her problem with me and asks me for advice on what she can do to help the employee improve his performance.
To help her solve this problem, I take my stack of sticky notes, set the timer for 30 minutes, and start jotting the following tips, tools, and resources that come to my mind. As I write, I slap them onto the wall.
Based on what I already know, here’s a partial list of what I come up with:
- Needs Assessment
- Expectations
- Monitoring
- Feedback
- Training
- Tools and equipment
- Support Needs
Brainstorming Tips
While brainstorming, don’t worry about placing your ideas in any order. You’ll organize them later. Also, don’t judge your ideas. Capture everything that enters your mind, letting your experience and creativity flow.
Write it down, even if it feels outlandish.
Step 2: Unleash Your Hidden Expertise with Market Research
We usually know much more than we remember in a 30-minute brainstorming session and tapping into that knowledge takes some intentional triggering. In this step, you’ll draw inspiration from other sources to stir up your hidden expertise.
There are many sources you can use, and here are three search engines you can mine for free:
- Amazon books,
- Google articles, and
- YouTube videos.
Using private browsing mode, enter your book’s topic into each search engine to uncover the issues in your niche that top-ranking books, articles, and videos cover.
As you find ideas, you can speak about confidently, jot them down on a sticky note, and post them on your wall. The same guidelines from Step 1 apply: keep things short, to the point, and without judgment.
The intent of this activity isn’t to plagiarize or steal other people’s content. It’s simply to gather more topic ideas for your book’s chapters, validate market demand for these topics, and make sure your book sells and delivers transformation.
Step 3 – Organize Your Ideas by Themes
You’ve done your research, picked up tons of ideas, and now have a wall full of stickies because you didn’t judge. Here’s how you’re going to organize them.
A. Do a Quick Review.
First, read through your sticky notes and identify patterns. What are the overarching themes that emerge from this quick review? Write those down on separate stickies; these will be your big picture themes. Then, stick these on another part of your wall large enough to hold all your sticky notes with ideas.
When I did this for the topic I’m working on now on how to write a nonfiction book, three overarching themes emerged:
- Writing,
- Self-Publishing, and
- Marketing.
B. Cluster Your Ideas Under Each Theme.
Go through all your sticky notes and place them under the overarching theme that fits best. For instance, if I had a sticky note with “how to structure,” and I put it under the “Writing” theme or cluster.
As you cluster your ideas by themes, if there’s anything that doesn’t resonate with you or that you’re not passionate about, set it aside.
C. Record Your Clusters.
Once you organize your clusters by theme, record them using software, an app, or another tool. You can use Microsoft Word, Excel, OneNote, Trello, or anything else.
I recommend you select a tool you already use so you don’t add a learning curve to your book writing process. Learning new tools now is unnecessary and will slow you down.
Also, you don’t need fancy tools to write a book. You can use special writing tools, but it’s not required. It’s a matter of choice.
Step 4 – Narrow Down Your Chapter Content
Chances are, you now have many more ideas than you can or should include in one book.
You don’t need to write an exhaustive encyclopedia on your topic. Instead, narrow your focus to one aspect of the issue and write more profound, meaningful, and actionable content. Only provide what’s essential for your client or ideal reader to achieve results.
For instance, in my example for a book about writing a nonfiction book, I came up with three overarching themes: writing, self-publishing, and marketing. Instead of writing a tome on the subject, I decided to write a series of three books, one per theme.
Step 5 – Select Your Book Structure
Determine the best book structure for your book. If you need examples, here are five ways to structure your nonfiction book that are easy to implement and used by professionals. They’re simple but highly effective.
Step 6 – Write Your Nonfiction Book Outline
Based on the book structure you selected, write your nonfiction book outline. Here’s an example of how to put one together.
Let’s say I’m writing a book for someone who needs to find a job, and I selected the Step-by-Step nonfiction book structure. My preliminary step-by-step outline could look something like this:
Example of a Step-by-Step Outline
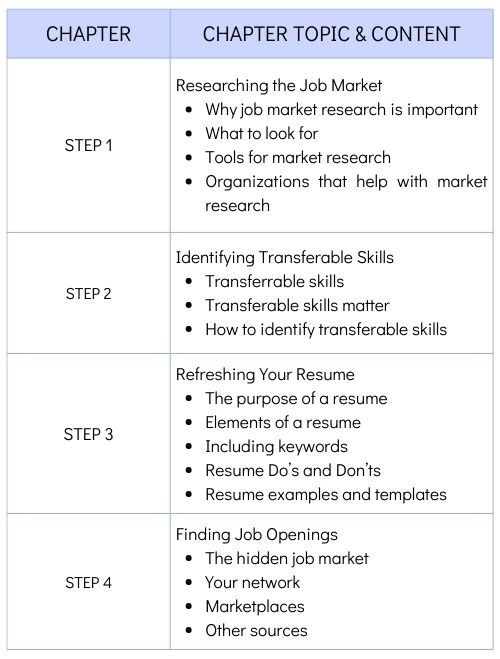
It’s that simple.
By the way, I made up this example, and it’s by no means complete or accurate. It’s just for illustration purposes.
Also, this outline doesn’t include the front matter, the pages before the introduction and the first chapter, or the back matter, the pages after the last chapter. It only covers the body matter, which encompasses the key text or chapters. You can add the front and back matter later.
For now, your goal is to write the body of your book. You can add the front and back matter when you’re ready to self-publish your nonfiction book like a pro.
This Level of Outlining Isn’t for Everyone
How much you should outline is a personal decision. In a previous article, 7 Advantages of Outlining a Nonfiction Book Before Starting to Write, I discussed how long a nonfiction book outline should be and shared two examples based on length.
Working Chapter Titles
At this point in the book writing process, your chapter titles are not 100% defined. Using the overarching topic for each chapter as a working title is perfectly acceptable. During the preliminary outlining process, you’re getting clear on the content of each chapter so you can write your book quickly and efficiently. You’ll nail the chapter titles later.
Your Nonfiction Book Content
Your book’s content includes the individual tips, tools, and resources you wrote on your sticky notes. That’s it.
You’ll refine your book and add the key elements of a professional nonfiction book later in the process. Your goal now is to complete a major milestone of your book writing and self-publishing journey: getting your first draft done.
This 6-step creative process I shared is a fun, fast, and easy way to generate and validate your book chapter ideas and write your nonfiction book outline. But it’s not the only way to outline.
What methods have you used to outline your nonfiction books?
Start Your First Nonfiction Book Today
Write Your First Nonfiction Book in 30 Days!
About Sylvia Melena
 SYLVIA MELENA is the Founder and CEO of Melena Consulting Group, a leadership and management consulting, training, and nonfiction book coaching company. She is also the international award-winning author of Supportive Accountability: How to Inspire People and Improve Performance and the former Vice President of the San Diego Book Awards Association.
As an unknown author with zero platform, Sylvia’s first book became a #1 Amazon Best Seller, sold thousands of copies across five continents, and was used to train leaders in university and workplace settings. Sylvia’s leadership philosophy has been featured in the Society of Human Resources Management HR Today, Entrepreneur, the Human Performance Association, My Quest for the Best, LEADx, Fit Small Business, and other channels.
SOURCE:

1 Wiggins, Geraint A., and Joydeep Bhattacharya. “Mind the Gap: An Attempt to Bridge Computational and Neuroscientific Approaches to Study Creativity.” Frontiers in Human Neuroscience, July 24, 2014. Retrieved from: https://www.frontiersin.org/articles/10.3389/fnhum.2014.00540/full. Dated accessed: August 16, 2022. Creative Commons License: https://creativecommons.org/licenses/by/4.0/.


I am just about to write an outline for my next non-fiction book, so this was a very timely article. The points discussed were very helpful indeed and I shall pay attention to them. I have printed out this article so that I can go over it more slowly when I am doing my outline. Thanks, Sylvia. Another top notch article.
Thank you, Sally! I’m glad you found the article useful. Congrats on your next book! – Sylvia